Study Material and Notes of Chapter 3 Introduction to GIMP Computer Science Class 9th
Image editing tools - Introduction
• Definition: Image editing encompasses the processes of altering images, whether they are digital
photographs, traditional analog photographs, or illustrations.
• Two ways to adjust and image:
→ Pixel editing: It works at the pixel level and requires altering the original image.
→ Parametric Image Editing: It works by saving instruction sets that change the appearance of images without actually changing the original image data.
List of Commonly used Image Editing Tools
• The GIMP: GNU Image Manipulation Program is free and powerful open source image editing tool that provides retouching of photos, authoring of photos and composition of photos.
• FastStone Image Viewer: The FastStone Image Viewer is an interactive application that provides the image editing, image browsing and image converting.
• Serif PhotoPlus X4: The Serif PhotoPlus X4 offers a wide variety of features such as photos organizer, scrapbooking, greeting cards, and web galleries.
• Photo Impression 6.5: This tool provides the image-editing facility in a very simple way.
• PhotoStudio 6: The PhotoStudio 6 allows you to add animated text and stamping facility on high-bit depth images. You can work with layers for image editing purpose and can easily transform your raw photos into good ones.
• Picasa: Picasa is the kind of application that the built in editor is more than robust enough for most casual users and includes basic color correction, cropping, and a variety of special effects—the majority of which manage to avoid being cheesy.
• Paint.net: The interface of Paint.net is easy to pick up and an unlimited undo function helps in correcting your learning, curve shapes, a snap making etc.
• Photo! Editor: Photo! Editor is powerful multifunctional software offering a complete set of image editing tools.
• Inkscape: The Inkscape is the open source image editing tool with standard features making it the best alternative of the Adobe Photoshop.
• Corel PaintShop Photo Pro X3: The Corel Paint Shop Photo Pro allows you to adjust and clean-up your photos using the integrated photo organizer with advanced enhancement tools.
GIMP Introduction
• Definition: GNU Image Manipulation Program is free and powerful open source image editing tool that provides retouching of photos, authoring of photos and composition of photos.
• The GIMP is a Free Software application covered by the General Public License [GPL] which provides users with the freedom to access and alter the source code.
• Features of GIMP are:
→ It can be used as a simple paint program
→ An expert quality photo retouching program.
→ An online batch processing system.
→ A mass production image renderer.
→ The advanced scripting interface allows everything from the simplest task to the most
complex image manipulation procedures to be easily scripted.
→ It can convert and save files to many file formats such as gif, jpef,tiff etc.
→ It can load and save animations in a convenient frame as layer format.
→ Virtually unlimited images can be opened at one time.
→ GIMP works with numerous operating systems including Linux, Mac OS and Microsoft Windows.
• How To Download GIMP
→ Go to www.gimp.org
→ Then click on Download button
→ Click “Download Gimp”
→ The Download will start
• File Formats supported in GIMP

• GIMP Compatible Platforms:
→ GNU/Linux (i386, PPC)
→ Microsoft Windows (XP, Vista, Windows 7)
→ Mac OS X
→ Sun OpenSolaris
→ FreeBSD
Starting GIMP
→ Step 1 - Select Start → All Programs → GIMP 2
→ Step 2 - The GIMP 2 window appears.
• How To Create New File
→ Click on File Menu
→ Select New option
→ Type the height or width /Choose a template
→ A dialog box appears; using this you can select the template and specify the size by setting values for both height and width.
→ Press OK and a new blank image file is created. Now, you can use the tools and create your own drawings.
• Opening an existing file
→ Click on file Menu
→ Select Open option
→ Select the file name and click on Open button.
• Saving a File
→ Click on File → Save as
→ The Save Image dialog box appears
→ Give a name to the file, select the format of the image and click on save button.
Understanding GIMP Window

• Main components of GIMP window are:
→ Menu bar: It is placed below the title bar. This menu gives you access to nearly every operation you can perform on an image.
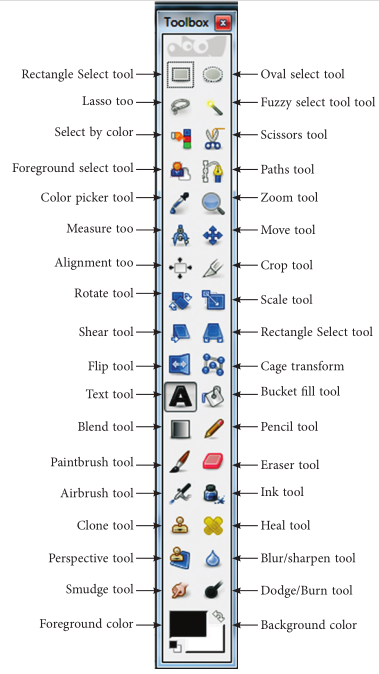
→ Toolbox: The GIMP provides a toolbox in order to quickly perform basic tasks such as making selections or drawing paths.
→ Ruler: The ruler provides guidelines which helps in positioning things accurately.
→ Status bar: It is placed at the `bottom of the image. It displays, what operation is being performed, and its state of progress.
→ Canvas: The most important part of the image window is image display or canvas. It occupies the central area of the window.
 |
| ToolBox of GIMP |
• Various Tool used in gimp are:
→ Rectangle Select tool [R]: The Rectangle Selection tool is designed to select rectangular regions of the active layer.
→ Oval Selection tool [E]: The Oval Selection tool is used to select circular and elliptical regions from an image, with high-quality anti-aliasing if you want it.
→ Lasso tool [F]: The Free Selection tool, or Lasso, lets you select a drawing it free-hand with the pointer, while holding down the left mouse button.
→ Select by Colour [Shift + O]: This tool is used to select areas of an image based on colour similarity.
→ Text tool [T]: This tool places text into an image.
→ Eraser tool [Shift + E]: This tool is used to remove areas of colour from the current layer or from a selection of this layer.
→ Bucket Fill tool [Shift + B]: This tool fills a selection with the current foreground colour.
→ Colour area: This area shows GIMP’s basic palette consisting of two colours; the foreground and the background which are used for painting, filling, and many other operations.
• The main difference between Magic Wand and Select by Colour:
→ The Magic Wand selects contiguous regions with all parts connected to the starting point by paths containing no large gaps while the Select by Colour tool selects all pixels that are sufficiently similar in colour to the pixel you click on, regardless of where they are located.
Menus of GIMP Window
• File Menu: Contains the most commonly used commands related to GIMP file.
 |
| File Menu of GIMP |
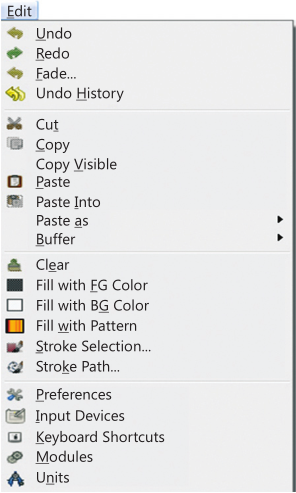
• Edit Menu: It contains the commands related to the handling of information i.e. cut, copy and paste and other selection commands.
 |
| EditMenu of GIMP |
• Image Menu: It contains commands which are used to edit the entire image or specific part of an image or active layer.
 |
| Image Menu of GIMP |
Editing the Images
• To change the Size of an Image (Scale):
→ Set the Resolution of image
→ Set the Interpolation Quality
→ Click on “Scale” to confirm.
• How to prepare images for web:
→ Step 1 - First need to reduce the image to a better width and height for web according to the scale.
→ Step 2 - In File → select Export
(In the JPEG Save Dialog, choose GIMP defaults which reduce the size of the image without damaging quality. We can also make compression by reducing quality of image by moving the “Quality” slider down.)
• How to Crop an Image:
→ Tools → Transform tools → Crop & resize
( Click and drag a rectangular shape to make corrections.)
Layers
• Layers are wonderful tools, especially to create collages or to delete various portions of an image.
• In GIMP, the layers are virtually stacked up on top of each other.
• The separate elements of the composite image can be kept on separate layers; return to the layered file and easily edit it before saving a new flattened file.
NCERT Solutions of Chapter 3 Introduction to GIMP

